

What Is the Difference Between Push Sticks and Push Paddles?
Push sticks and push paddles are essential safety tools for woodworking, but they serve slightly different purposes on machinery like table saws and jointers. Push sticks typically feature a long, narrow handle with a notch at the end that grips workpieces. Push paddles, conversely, have a wider, flat surface designed to apply downward pressure and forward momentum simultaneously. Both tools keep your hands away from spinning blades and cutterheads, reducing injury risk significantly. Understanding their distinct designs helps you choose the right tool for your specific woodworking task and machine setup.
In June 2026, safety remains the top priority for woodworkers of all skill levels. The choice between push sticks and push paddles depends on your project requirements, machine type, and personal comfort. Neither tool is universally superior; instead, most professional shops maintain both in their safety arsenal. This article explores the critical differences, advantages, and best applications for each tool to help you make an informed decision.
Key Takeaway: Push sticks and push paddles both protect your hands, but push sticks excel at ripping narrow stock while push paddles provide superior control for planing and jointing operations.
How Do Push Sticks Work and When Should You Use Them?
Push sticks are the traditional safety device for table saw ripping operations. They feature a long wooden handle, typically 18 to 24 inches, with a V-notch or hook at the end. This notch grips the back edge of your workpiece, allowing you to maintain forward pressure while keeping your hands at a safe distance from the blade. The narrow profile makes push sticks ideal for ripping strips narrower than 4 inches wide. They work by converting your downward and forward hand movements into controlled workpiece motion.
Push sticks excel in these specific scenarios:
- Ripping narrow boards on a table saw (under 4 inches wide).
- Feeding stock through the blade with precise control.
- Creating consistent widths for frame components or trim pieces.
- Working with hardwoods requiring careful feed rates.
- Maintaining a secure grip on small or awkward stock shapes.
Push Stick Design Features
Quality push sticks share common design elements that maximize safety and control. The handle should be comfortable to grip, with adequate length to position your hand at least 12 inches from the blade. Most experienced woodworkers prefer wooden push sticks because they’re lightweight, easy to customize, and won’t conduct electricity if used near electrical equipment. The notch design varies: some feature a simple V-cut, while others use a hook or shovel-like configuration for different grip preferences.
The best push sticks include a slight downward angle at the working end. This angle naturally applies downward pressure on the workpiece, preventing kickback and climb. Many woodworkers make their own push sticks from hardwood scraps, allowing customization for their specific machines and hand sizes. Store your push stick within arm’s reach of your saw for quick access during ripping operations.
Key Takeaway: Push sticks provide precision control for narrow ripping but require proper technique and consistent hand positioning to work effectively.
What Are Push Paddles and Why Are They Different?
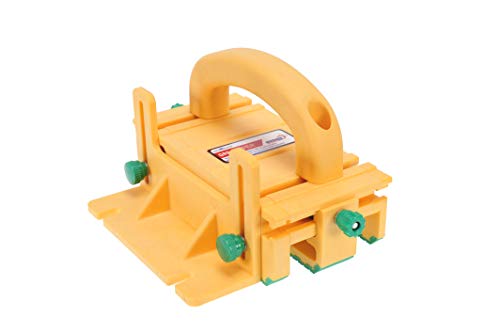
Push paddles represent a different approach to workpiece control, featuring a wider, flatter surface that applies pressure across a larger area. They typically measure 4 to 8 inches wide and 12 to 18 inches long, resembling a wooden paddle or spatula. Push paddles are designed for operations requiring downward pressure and forward feed simultaneously, such as jointing, planing, or sanding. The wider contact area distributes force more evenly, reducing the risk of gouging or uneven cuts on sensitive surfaces.
Push paddles offer distinct advantages for specific woodworking tasks:
- Applying consistent downward pressure on jointer beds and planer tables.
- Feeding wide boards through machinery safely and smoothly.
- Protecting finished surfaces from hand marks or damage.
- Controlling stock during sanding operations on stationary sanders.
- Maintaining parallel feed for uniform thickness planing.
Push Paddle Design and Material Considerations
Push paddles are often constructed from hardwood, plastic, or composite materials. Hardwood paddles provide traditional feel and durability, while plastic versions offer lower cost and easier cleaning. The paddle surface should be smooth and flat to prevent snagging on workpiece edges. Many paddles include a handle that angles away from the work surface, allowing comfortable hand positioning above the machinery.
The effectiveness of a push paddle depends on its weight and balance. Heavier paddles provide better momentum transfer, while lighter versions offer more precise control. Some woodworkers prefer paddles with beveled edges to reduce catch points. For jointer work, paddles should be slightly shorter than your jointer bed length to prevent binding against the outfeed table.
Key Takeaway: Push paddles excel at applying distributed pressure for planing and jointing, making them safer than hands for wide boards and sensitive surfaces.
How Do You Compare Safety Features and Injury Prevention?
Both push sticks and push paddles significantly reduce hand injury risk compared to operating machinery without protection. Push sticks maintain distance through their long handles, typically keeping hands 12 to 18 inches from the cutting tool. Push paddles work differently by covering a wider contact area, preventing accidental hand contact with cutting surfaces. Neither tool is foolproof; proper technique, machine setup, and attention remain essential for safe woodworking.
Critical safety considerations for each tool include:
- Push sticks require firm grip and controlled feeding to prevent kickback.
- Push paddles must be held with both hands for maximum control and safety.
- Neither tool should be used on machinery without proper guards installed.
- Always maintain focus and avoid distractions during powered tool use.
- Inspect tools regularly for cracks, splinters, or damage before use.
- Consider wearing appropriate safety gear, including eye protection and dust masks.
Injury Statistics and Prevention Best Practices
According to the Occupational Safety and Health Administration (OSHA), table saw injuries account for thousands of emergency room visits annually. Using push sticks or push paddles reduces injury severity and frequency substantially. The National Safety Council recommends maintaining awareness of blade position, feed direction, and hand placement throughout every cut. Combining tool use with proper machine setup creates a comprehensive safety strategy.
Kickback prevention is equally important as hand protection. Push sticks naturally prevent kickback through their design, while push paddles require proper hand positioning to achieve the same result. Never override your machine’s safety features or remove guards to accommodate a push tool. If a tool doesn’t fit your specific operation, redesign your approach rather than compromising safety.
Key Takeaway: Push sticks and push paddles both reduce injury risk significantly, but only when combined with proper technique, machine setup, and consistent safety practices.
Which Tool Should You Choose for Your Woodworking Projects?
Selecting between push sticks and push paddles depends on your primary woodworking operations and machinery. If you spend most time ripping narrow stock on a table saw, a quality push stick is non-negotiable. Conversely, if you regularly joint, plane, or sand wide boards, push paddles become your primary safety tool. Many professional woodworkers maintain both tools in their workshop, using each appropriately for its intended purpose. Consider your project pipeline and machine usage patterns when deciding where to invest your safety tool budget.
Decision factors include:
- Machine types you use most frequently (table saw, jointer, planer, sander).
- Stock dimensions you typically work with (narrow vs. wide boards).
- Your experience level and comfort with different tool designs.
- Available storage space near your machines.
- Budget for purchasing or making multiple tools.
- Personal preference based on hand size and grip strength.
Creating a Complete Safety Tool Kit
The ideal woodworking shop includes multiple push sticks and paddles, each optimized for specific machines. Keep a dedicated push stick within arm’s reach of your table saw, preferably hanging on the wall or stored in a tool rack. Store push paddles near your jointer, planer, and sanding stations. Having tools readily accessible encourages their use, improving overall shop safety culture. Consider labeling tools with their intended use to guide less-experienced woodworkers in your shop.
Building your safety tool kit doesn’t require significant expense. Many woodworkers make their own tools from hardwood scraps, customizing dimensions for their specific machines and preferences. Alternatively, numerous manufacturers offer pre-made options in various sizes and styles. The investment in proper safety tools pays dividends through injury prevention and peace of mind during every woodworking session.
Key Takeaway: A complete workshop maintains both push sticks and push paddles, with tools positioned conveniently near the machines where they’ll be used most.
What Are the Practical Tips for Using Push Sticks and Paddles Effectively?
Proper technique maximizes the safety and effectiveness of push sticks and paddles. For push sticks, maintain a firm grip on the handle and apply steady downward pressure while feeding the workpiece forward. Never rush the cut; let the blade or cutter do the work at its own pace. Position your body to the side of the tool, never directly behind the workpiece, to avoid kickback injuries. Keep your eyes on the cut and the tool position throughout the operation.
Essential techniques for push stick use:
- Grip the handle firmly with your dominant hand positioned near the end.
- Apply consistent downward pressure to prevent blade climb.
- Feed the workpiece at a steady, moderate pace without forcing.
- Never reach over or around the tool to adjust the workpiece.
- Allow the blade to stop completely before removing the workpiece.
- Keep your free hand away from the blade path at all times.
Push Paddle Technique and Best Practices
Push paddles require a two-handed grip for maximum control and safety. Position your hands on either side of the paddle handle, applying even pressure across the entire surface. For jointer work, keep the paddle flat on the bed and move it smoothly with the workpiece. Never lift the paddle suddenly, as this can cause the workpiece to bind or kick. On planers, maintain steady forward pressure without fighting the machine’s feed rollers.
Common mistakes to avoid include rushing operations, using damaged tools, and applying excessive pressure. Let machinery do its work; excessive force indicates improper setup or dull cutting tools. Inspect your push tools regularly for cracks, splinters, or delamination. Replace or repair damaged tools immediately rather than continuing to use compromised equipment. Building good habits now prevents injuries and extends tool life significantly.
Key Takeaway: Proper technique involves steady, controlled pressure with appropriate tool selection for each operation, combined with constant attention and awareness.
Frequently Asked Questions
Can you use a push stick on a jointer?
Push sticks are not ideal for jointers because they don’t provide adequate downward pressure on wide surfaces. Push paddles work much better for jointer operations, as their wider surface applies consistent pressure across the entire workpiece width. Using a push stick on a jointer increases the risk of the workpiece tipping or catching on the cutterhead. Always use the appropriate tool for each machine to maintain safety and achieve quality results.
What size push stick should you make?
A push stick should be 18 to 24 inches long, with the handle positioned to keep your hand at least 12 inches from the blade. The notch should be sized to grip your typical workpiece thickness comfortably. Taller woodworkers may prefer longer handles, while those with smaller hands might opt for shorter versions. Make several push sticks in different sizes to accommodate various workpiece dimensions and personal preferences in your workshop.
Are push paddles safer than push sticks?
Neither tool is universally safer; they’re designed for different operations. Push sticks excel at ripping narrow stock, while push paddles work better for jointing and planing. Both significantly reduce injury risk compared to hand-feeding. The safest approach uses the correct tool for each specific operation, combined with proper technique and machine setup. Safety depends more on correct tool selection and technique than on the tool itself.
How often should you replace push sticks and paddles?
Replace push tools when they show signs of damage including cracks, splinters, delamination, or worn notches. Well-maintained wooden tools can last for years if properly cared for. Inspect your tools before each use, and replace them immediately if damage is visible. Keeping backup tools ensures you always have safe equipment available, even if your primary tools need maintenance or replacement.
Can you use a push paddle on a table saw?
Push paddles are not recommended for table saw ripping because they don’t provide the precise control needed for narrow cuts. Their wide surface can interfere with the blade guard and fence setup. Push sticks are specifically designed for table saw work, offering the control and hand distance necessary for safe ripping. Using the wrong tool for your machine increases accident risk and reduces cut quality.
What material is best for homemade push tools?
Hardwoods like oak, maple, or walnut make excellent push tools because they’re durable and won’t conduct electricity. Avoid softwoods that splinter easily or engineered materials that delaminate. Make tools from solid wood scraps at least 3/4 inch thick for adequate strength. Finish wooden tools with oil or wax to protect against moisture and wear, extending their useful life significantly.
Should You Invest in Both Push Sticks and Push Paddles for Your Workshop?
Yes, a well-equipped woodworking shop includes both push sticks and push paddles, each optimized for specific operations. Push sticks are essential for table saw ripping, while push paddles become indispensable for jointing, planing, and sanding operations. The relatively low cost of these tools makes maintaining multiple versions practical and economical. Investing in proper safety equipment now prevents expensive injuries and emergency medical care later.
Consider your current and future woodworking plans when building your safety tool collection. If you primarily work with narrow stock on a table saw, start with quality push sticks. As your shop grows and you add jointers or planers, add push paddles to your safety arsenal. Many woodworkers discover they prefer making their own tools, allowing customization for specific machines and personal preferences. Whatever approach you choose, prioritizing safety tools demonstrates commitment to injury prevention and professional woodworking practices.
For additional information on woodworking safety, explore related topics like P100 vs N95 Respirator Masks for Wood Dust and proper machine setup techniques. Building a comprehensive safety culture in your workshop protects you and any other woodworkers who use your space. Remember that no tool replaces attention, proper technique, and respect for machinery power. Combine push sticks and paddles with guards, proper setup, and focused work practices for the safest possible woodworking experience.
Key Takeaway: Maintaining both push sticks and push paddles in your workshop ensures you have the right safety tool for every operation, maximizing protection and cut quality.


Write Your Review
No reviews yet. Be the first to share your experience!